webXR demo of google glb model

Demo link - https://mritunjay.vercel.app/dog
(webXR is only supported in android for chrome for now)
Previously there was webVR which is deprecated now by new webXR api. XR here stand .For mixed reality capabilities it provides. webXR api only deals with session timing, scheduling, and surronding environment information for 3D model rendering and manipulation we will use threejs.
I will assume that you have at least a passing knowledge of 3D, and reasonable proficiency with JavaScript.
Quickly starting with adding threejs module in your project
yarn add three
for 3d model we are using google glb format beagle(dog) model. you can download it from https://storage.googleapis.com/ar-answers-in-search-models/static/dogs/Beagle/Beagle.glb
First of all we will initialze some variable moving forward we will assign value to it
// index.js component file
import React from 'react';
import * as THREE from 'three';


export function BeagleARView() {
  let renderer = null;
  let scene = null;
  let camera = null;
  let model = null;
  let mixer = null;
  let action = null;
  let reticle = null;
  let lastFrame = Date.now();
  let spotLight;

  // light variables
  let lightSpotColor = 0xDDDDDD;
  let lightSpotIntensity = 0.7;
we will add an init function here to update the values, before that we will get to know some basic of 3D with threejs. Things to know about threejs :
Scene: Scene is like virtual space which have co-ordinate info and set up to what and where to render. In sence we can add multiple objects(3D models), lights and remove them.
Renderer: It display/draw the scene. Threejs use webGL for render and image processing.
Camera: There are multiple types of camera. we will be using perspective camera which works as you eyes view point and changes object size's according to view position.
// inside BeagleARView component
  const initScene = (gl, session) => {
    scene = new THREE.Scene();
    camera = new THREE.PerspectiveCamera(
      75, // fov (angle, field of view)
      window.innerWidth / window.innerHeight, // aspect
      0.1, // frustum near length
      1000, // frustum far length
    );
now in this initScene function we will load our 3D model
//add this at top below threejs import
import { GLTFLoader } from 'three/examples/jsm/loaders/GLTFLoader.js';
const Beagle = require('./beagle.glb')


//continue now in init function
    // load our gltf model
    var loader = new GLTFLoader();
    loader.load(
      Beagle,
      gltf => {
        model = gltf.scene;
        model.scale.set(1.8, 1.8, 1.8);
        model.castShadow = true;
        model.receiveShadow = true;

        mixer = new THREE.AnimationMixer(model);
        action = mixer.clipAction(gltf.animations[0]);
        action.setLoop(THREE.LoopRepeat, 15);
      },
      () => {},
      error => console.error(error),
    );
// we have only loaded the object haven't added that in scene now.
// we will do it later
in the same fnc we now need to add some light on our 3D model. we will use spot light to get only focus on object properly and to get cast shadow feature.
spotLight = new THREE.SpotLight(lightSpotColor, lightSpotIntensity);
spotLight.position.set(1, 1,  -9);
spotLight.target = scene;
//spotLight.castShadow = true; // for now we will not work on shadows
scene.add(spotLight);
we are done with scene, light and 3D model loading part we will now add the last threejs setup part which is renderer.
    // create and configure three.js renderer with XR support
    renderer = new THREE.WebGLRenderer({
      antialias: true,
      alpha: true,
      autoClear: true,
      context: gl,
    });
    renderer.setPixelRatio(window.devicePixelRatio);
    renderer.setSize(window.innerWidth, window.innerHeight);
    renderer.xr.enabled = true;
    renderer.xr.setReferenceSpaceType('local');
    renderer.xr.setSession(session);

    // simple sprite to indicate detected surfaces
    reticle = new THREE.Mesh(
      new THREE.RingBufferGeometry(0.12, 0.15, 20).rotateX(-Math.PI / 2),
      new THREE.MeshPhongMaterial({ color: 0x0fff00 }),
    );
    // we will update it's matrix later using WebXR hit test pose matrix
    reticle.matrixAutoUpdate = false;
    reticle.visible = false;
    scene.add(reticle);
}
// closing intiScene
In above piece of code we have added rectile object which will help identify which surface area we are pointing our camera.
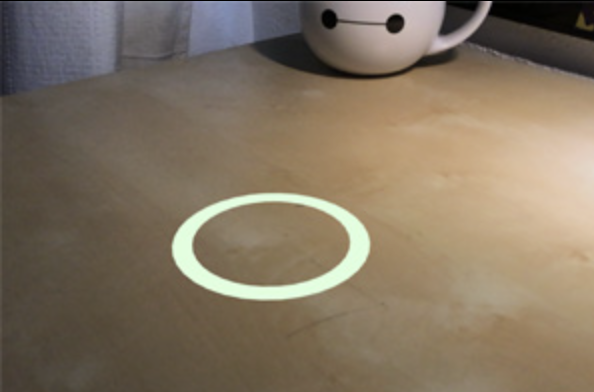
reticle image
After all threejs setup in initScene we will now start doing webxrSession related things where we call this initScene.
Without user interaction we can't start webxrSession for that we will first add a button in our jsx return
const xrButton = useRef(null);

return (
// id xrOverlay will be used later
<div id="xrOverlay">
  <button id="xrbutton"  ref={xrButton} onClick={onXRButtonClick}>
    Start experience
  </button>
</div> )
  function checkXR() {
    if (!window.isSecureContext) {
      // show message to use secure connection,
      // webXR need https for giving device permission
    }
    if (navigator.xr) {
     xrButton?.current?.disabled = false;
    } else {
     xrButton?.current?.disabled = true
      // show message that this device or browser does not support webXR
    }
}

  React.useEffect(() => {
    checkXR();
  }, []);
we have added function to check whether XR is supported or not. Now we will work on main part of starting webXR session with required feature we need for hit and place feature.
we will request immersive session with dom-overlay, local, and hit-test features.
- dom-overlay: It will allow to add html DOM content on screen while we are in session.
- local: Enables your device as views position while session is started.
- hit-test: It gives surface information we hit and want to place our 3D model.
There are many more feature we can request as per our needs like hand-tracking, depth sensing etc.
  let xrSession = null;
  let xrRefSpace = null;
  let xrHitTestSource = null;

  function onXRButtonClick() {
    if (!xrSession) {
      navigator.xr
        .requestSession('immersive-ar', {
          optionalFeatures: ['dom-overlay'],
          requiredFeatures: ['local', 'hit-test'],
          domOverlay: { root: document.getElementById('xrOverlay') },
        })
        .then(onSessionStarted, onRequestSessionError);
    } else {
      xrSession.end();
    }
  }
we have passed document.getElementById('xrOverlay') so, any input and interaction to this DOM can only be acessible for xrSession manipulation.
  function onSessionStarted(session) {
    setIsWebXRStarted(true);
    xrSession = session;

    // create a canvas element and WebGL context for rendering
    session.addEventListener('end', onSessionEnded);
    let canvas = document.createElement('canvas');
    gl = canvas.getContext('webgl', { xrCompatible: true });
    session.updateRenderState({ baseLayer: new XRWebGLLayer(session, gl) });

   // here we have register source from where we want to get hit test result in surronding
    space
    session.requestReferenceSpace('viewer').then(refSpace => {
      session.requestHitTestSource({ space: refSpace }).then(hitTestSource => {
        xrHitTestSource = hitTestSource;
      });
    });

    session.requestReferenceSpace('local').then(refSpace => {
      xrRefSpace = refSpace;
      session.requestAnimationFrame(onXRFrame);
    });

// we have added click listner once session is started to place object once we have
// surface information after hit-test result.
    document.getElementById('arOverlay').addEventListener('click', placeObject);

    // initialize three.js scene
    initScene(gl, session);
  }
Now, we have to add last main function to handle each updated frame in session. As we registered onXRFrame at session.requestAnimationFrame() in above code.
  function onXRFrame(t, frame) {
    let session = frame.session;
    // calling it recursively to get current updated frame information
    session.requestAnimationFrame(onXRFrame);
    if (xrHitTestSource) {
      // obtain hit test results by casting a ray from the centre of device screen
      // into AR view. Results indicate that ray intersected with one or more detected surfaces
      const hitTestResults = frame.getHitTestResults(xrHitTestSource);
      if (hitTestResults.length) {
        // obtain a local pose at the intersection point
        const pose = hitTestResults[0].getPose(xrRefSpace);
        // we are changing reticle position and view at the intersection
            point to get visible  feedback on which surface the hit result is in this frame.
        reticle.matrix.fromArray(pose.transform.matrix);
        reticle.visible = true;
      }
    } else {
      // do not show a reticle if no surfaces are intersected
      reticle.visible = false;
    }

    // update object animation if your model contains animation
    updateAnimation();
    // bind our gl context that was created with WebXR to threejs renderer
    gl.bindFramebuffer(
      gl.FRAMEBUFFER,
      session.renderState.baseLayer.framebuffer,
    );
    // render the scene
    renderer.render(scene, camera);
  }
Add this for model animation in each frame update
  function updateAnimation() {
    let dt = (Date.now() - lastFrame) / 1000;
    lastFrame = Date.now();
    if (mixer) {
      mixer.update(dt);
    }
  }
The End!
Now that our demo is complete I will open my repo for this demo next week. This is my first blog on webXR, will write more in coming days on more interesting features. Cheers!